Showing posts with label food. Show all posts

Friday, February 27, 2015

Thai Dishes on Broadway - Santa Monica, CA

YUM! I would definitely recommend this awesome Thai restaurant if you are in Santa Monica, CA. At Thai Dishes on Broadway, I was even able to sit outside on a heated patio and eat dinner. This is a real treat if you're from Illinois! I just loved this place! I got my usual Thai favorite, Broccoli Beef, but the sauce was not too thick, just like I like it. The flavors weren't overpowering, and the beef and broccoli were cooked perfectly! I also had a Singha beer with dinner, and I really enjoyed just sitting and people watching. The place is just over a block to the entrance of the Santa Monica Pier.

 This place is very classy, but not super dressy. It would be perfect for a date, dinner with friends, dinner with family, a medium-sized group, and great for lunch and dinner.

Saturday, February 7, 2015

Gourmet Chocolate Heart Candies - Made At Home!

I had SO much fun creating these heart chocolates. I made them in several varieties, and I am going to tell you how each one turned out! I used the highest-quality ingredients, mostly from the baking aisle and craft stores (for the heart mold and sprinkles). These turned out so well! 
 These would be the perfect Valentine's Day gift for someone who loves sweets but is hard to shop for! These aren't super expensive to make, like some seasonal recipes are, either! 
******
INGREDIENTS:
*Note - do not use almond bark or candy melts for this method*
For best results, use a spoon to place toppings in heart mold. Let's begin the fun! 
Here are my "toppings" from left to right. 
Heath - make sure to only use a light, single layer of these or they won't all stick to the chocolate.
Andes - My favorite! Fill with Andes about 1/3 of the way.
Sprinkles - Look best on white chocolate, rather than milk.
Chopped Walnuts - Use only a light layer, similar to Heath.
Larger Sprinkles - use a single layer for best results.
*The prettiest ones were the little nonpareils (tiny ball sprinkles) in a single layer*
Now, melt the chocolate! I used a double boiler method (explained here - but do not add any butter). I used a shallow, medium pot and filled it about 1/3 of the way with water. I placed two 2 Cup Pyrex measuring cups in the water for a double boiler. Melt 1 package each of the milk chocolate and white chocolate in separate cups. Slowly melt the chocolates, and stir frequently. They should be smooth and move easily. 
******
Once your melted chocolate is smooth, remove the cups with an oven mitt, and place them onto a towel near your work space. Get a little bit of chocolate onto a spoon, and begin adding milk chocolate to half of the hearts...
And, white chocolate to the other hearts. Be careful not to get chocolate everywhere, so your end result is prettier.
Carefully, slide the hearts onto a baking sheet or cutting board to transport them into the freezer. 
Here they are after being in the freezer for less than an hour! Make sure they are completely cooled and hardened before you move them. 
One of my favorite parts was removing the fresh chocolates from the molds and seeing my creations! I liked most all of them, and think they would look adorable packaged up all cute for Valentine's Day! 

Friday, February 6, 2015

Strawberry Muffins From Scratch - With Pink Icing!

I wanted to make something with strawberries for Valentine's Day and here they are! The muffins don't need the icing, but it sure made them cute. I used mini muffin tins, and they were perfectly bite sized. These muffins were very moist, so make sure you cook them thoroughly. 

STRAWBERRY MUFFINS FROM SCRATCH 
2 C. all purpose flour

1/3 C. sugar

1 T. baking powder
1/2 t. salt
1 t. cinnamon
2 large eggs
1 C. milk
1/4 C. vanilla yogurt
1/2 t. vanilla extract
1 1/2 C. fresh strawberries, hulled and finely chopped
******

Mix all ingredients except for strawberries. 
Here is my muffin batter before I added the strawberries and sugar. 
Below, I pureed the strawberries and added them to my batter. I also added 2 drops of food coloring to enhance the pink color for the photos :)
Bake the mini muffins for 15-18. Now, make your icing. 
I made a simple icing in my food processor. Add all ingredients, and process until combined. Scrape sides to incorporate any extra ingredients. Pour into smaller bowl to spoon onto muffins. 
ICING INGREDIENTS -  Original Recipe
1 Tbsp Butter - 1 C. Powdered Sugar - 1-2 Tbsp milk - 1/4 tsp vanilla - 2 tsp. fruit - Food Coloring
Thanks for stopping by! These were even great the next day. Enjoy! 

Saturday, January 24, 2015

Brewery Review / Restaurant Review - St. Nicholas Brewing Co. DuQuoin, IL

The sunny weather made our visit to St. Nicholas Brewing Co. really lovely today. The brewery is located about a 20 minute drive from Carbondale, in Du Quoin, IL. It is just off the main strip, and is located around the corner from Doc Z's Fitness, which I thought was a perfect fit. 

St. Nicholas Brewing Co. is all brick, inside and out! They opened in August of 2014s, and the building was built in the 1880s, as a hotel. They did a great job renovating the space, opening it up to let lots of light in, creating a very inviting atmosphere, and keeping lots of original and unique details of the old hotel. This place is definitely worth checking out if you are in the area.
I liked the Blonde Ale. Super light and not too hoppy. We also tried the Cadence Porter and it's apparently coming home in a growler next time. Only $8 growler refills! 
 We actually all wound up getting burgers! Mine, pictured below, was their Basic Burger on a Pretzel Bun, with a side of Mac N Cheese. YUM! The burger was a teeny bit greasy/drippy, but other than that it tasted really good. The other 2 burgers weren't though. My Mac N Cheese was definitely creamy and had a kind of lighter taste. The potato chip crumble topping was unique and good.
We also got the St. Nick Sweet & Spicy Burger (with parmesan, jalapeño, pineapple, and pickle with sweet BBQ sauce), and the Mac & Cheese Burger (topped with Mac!).
Here are the Cadence Porters.
 And, the Blonde Ale. 
 The Brewing Viewing Area
 And, the old brick lined every wall of this airy space. 
 The entrance was very tall, and had this red barn wood at top. Brewing area was on the right.
 So, make sure to check out St. Nicholas Brewing Co. at 12 S. Oak Street in Du Quoin, IL. 

Friday, January 23, 2015

Peanut Butter - Coconut Oil - Oat Cookies

I found a fun app a while back and love it! Steller is really a great way to share any kind of story. I find it especially good for sharing recipes! It is a way to share a multiple page photo story, and you can add attractive text to images AND videos! It's really fun and I urge you to check it out. 

Here is my Steller Story about making Coconut Oil Peanut Butter Cookies! There are more photos to see, so check out the rest (and the recipe!!!) on Steller!

Thursday, December 4, 2014

The Best Butter Brownies Recipe

These brownies are amazing! They're so much better than box mix brownies, I urge you to switch to a recipe like this one.
YUMMY BUTTER BROWNIES INGREDIENTS:
10 tbsp. butter - melted
14 tbsp. chocolate chips
1 C. Sugar
1 1/2 tsp vanilla
1/4 tsp. salt
1Tbsp cocoa powder
2 eggs
2 Tbsp warm water
1 tsp hot chocolate mix
2/3 C. Flour
1 - 1 1/2 C. Walnuts

Bake at 375 for 28-30 minutes.

DIRECTIONS: 
Create a double boiler setup for the butter and chocolate chips. Put a few inches of water in a small saucepan, and place a 2 C. Pyrex measuring cup into the water. Add your butter, and turn on the stove to medium heat to begin boiling the water. This will allow the ingredients to melt slowly. Once the butter is almost completely melted, add the chocolate chips and begin to stir. Once melted, mix until well incorporated, and remove from heat.
In a medium mixing bowl, combine sugar, butter and chocolate chip mixture, vanilla, salt, cocoa powder, eggs, water, hot chocolate mix, and flour. Stir until combined well and batter is smooth.
Put 1 to 1 1/2 C. walnuts and crush them with a measuring cup. 
Add walnuts to the other ingredients, and stir until combined. 
Now, prep your jars. Spray cooking spray on them, and wipe off any excess spray from the tops and outsides of jars. Using a regular tablespoon, carefully scoop batter into jars, (a little over half full), making sure to avoid getting batter on tops of jars. Add a whole walnut to each jar just for a special touch. 
Bake at 375 for about 28-30 minutes. More time may be needed, so once a toothpick is inserted and comes out batter-free, your brownies are done! Be careful when handling the jars, as they are very hot.

Wednesday, December 3, 2014

Fall Leaf Rice Krispy Treats / Made the REAL way!

Ever wonder why your rice krispy treats don't turn out soft, rich, buttery, and super tasty? You may be using the wrong method. Here, I will show you the old-fashioned way to make Rice Krispy Treats on the stovetop - with real butter.
I love how these little leaf treat pops turned out! They could be customized to just about any holiday or party theme, too! Feel free to add food coloring to them to really customize them in a new, unique way. 
Here we go!
Ingredients:
- 3 Tbsp. REAL Butter (Organic Preferred)
- 6 C. Rice Krispy Cereal 
- 6 C. Marshmallows
- Sprinkles in Seasonal Colors
(Not Pictured)
- Parchment Paper
- Baking Dish 
- Smaller Wooden Skewers
- Leaf-Shaped Cookie Cutters
Instructions: 
In a large pot, melt butter over low heat (slower is better, so the butter doesn't burn.). 
As that melts, add marshmallows. Continue to melt the ingredients over low-medium heat. 
Make sure to watch the mixture so it doesn't brown. 
The mixture should look a little something like this right before you add the cereal.
Add the cereal and mix well to combine all of the ingredients. 
Next, transfer the cereal mixture to the pan. 
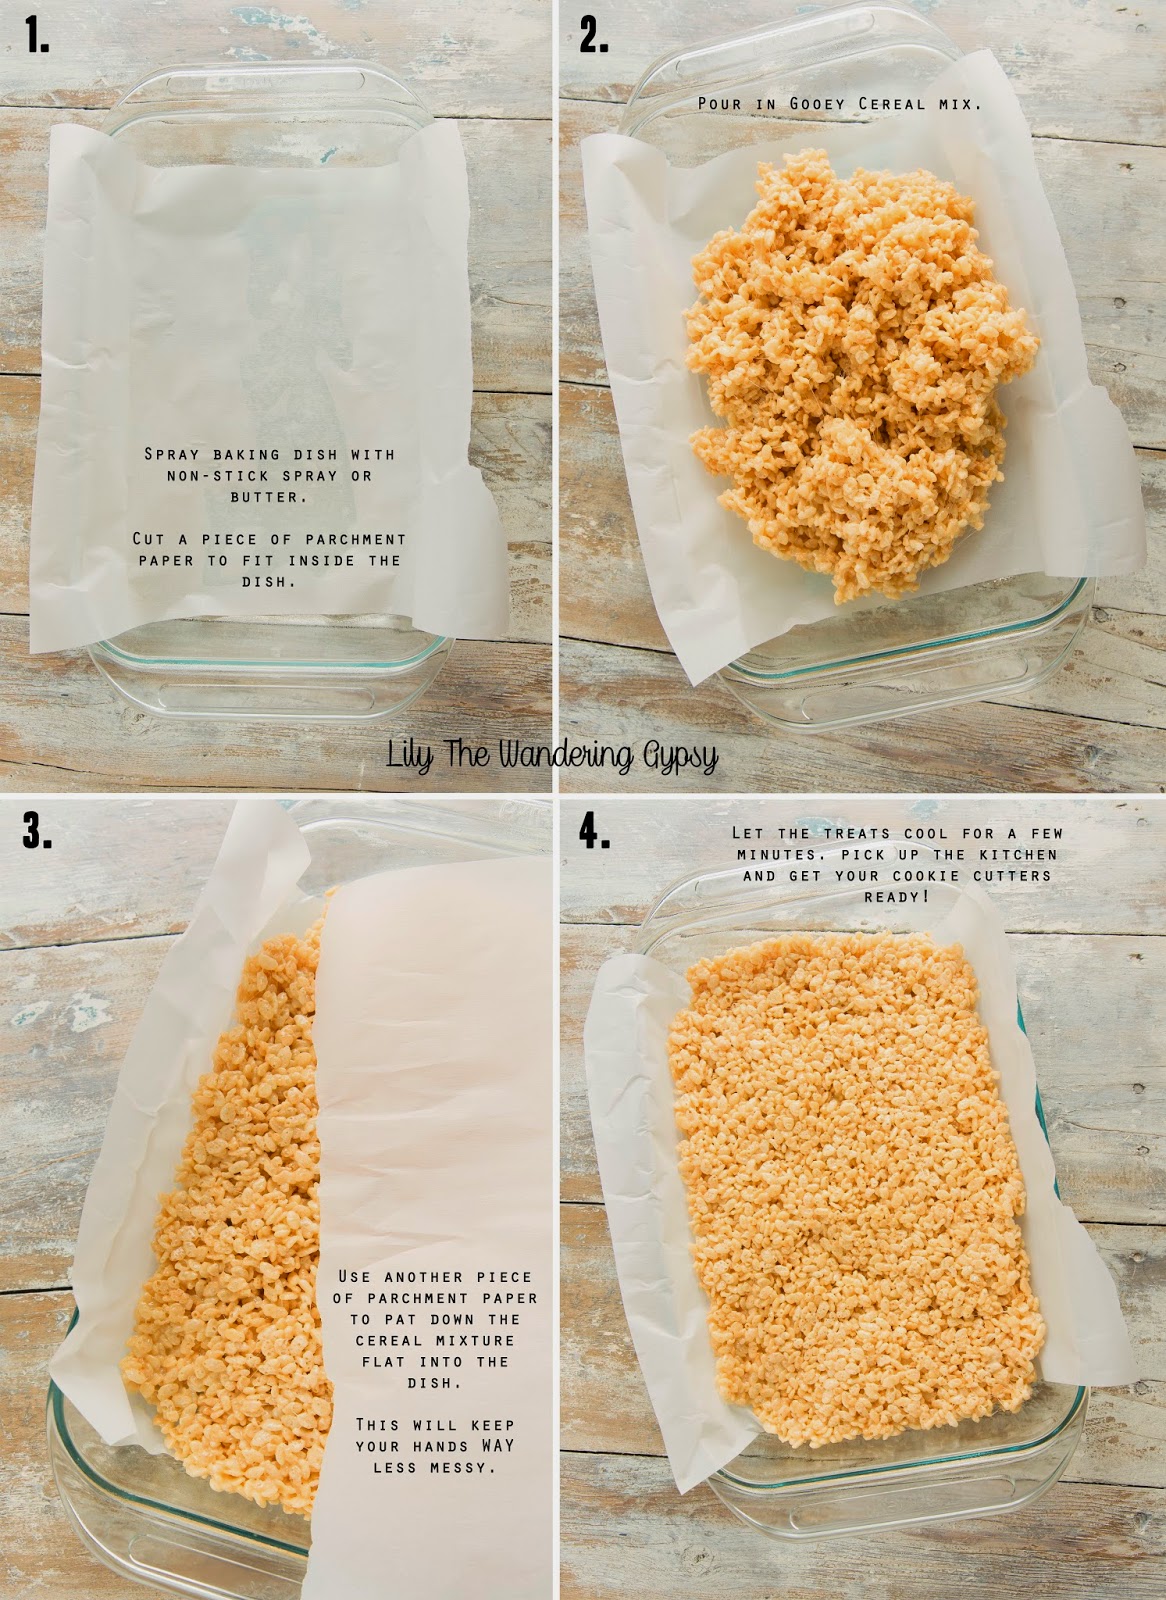
1.) Spray baking dish with non-stick spray or butter. Cut a piece of parchment paper to fit inside the dish.
2.) Pour in Gooey Cereal Mix.
3.) Use another piece of parchment paper to pat down the cereal mixture flat into the dish. This will keep your hands WAY less messy.
Once cereal has cooled, remove the cereal and parchment paper, and put it onto a cutting board.
Use your favorite leaf-shaped cookie cutter, press firmly down into treats. You can use a bit of non-stick spray on the cookie cutter if the treats stick. Carefully insert small skewer sticks into the leaves. Make sure you don't jab your hand...
I got about 12-13 leaves out of my batch, and had lots of pieces left over to devour :)

Enjoy! Happy Fall!