Thursday, December 4, 2014

The Best Butter Brownies Recipe

These brownies are amazing! They're so much better than box mix brownies, I urge you to switch to a recipe like this one.
YUMMY BUTTER BROWNIES INGREDIENTS:
10 tbsp. butter - melted
14 tbsp. chocolate chips
1 C. Sugar
1 1/2 tsp vanilla
1/4 tsp. salt
1Tbsp cocoa powder
2 eggs
2 Tbsp warm water
1 tsp hot chocolate mix
2/3 C. Flour
1 - 1 1/2 C. Walnuts

Bake at 375 for 28-30 minutes.

DIRECTIONS: 
Create a double boiler setup for the butter and chocolate chips. Put a few inches of water in a small saucepan, and place a 2 C. Pyrex measuring cup into the water. Add your butter, and turn on the stove to medium heat to begin boiling the water. This will allow the ingredients to melt slowly. Once the butter is almost completely melted, add the chocolate chips and begin to stir. Once melted, mix until well incorporated, and remove from heat.
In a medium mixing bowl, combine sugar, butter and chocolate chip mixture, vanilla, salt, cocoa powder, eggs, water, hot chocolate mix, and flour. Stir until combined well and batter is smooth.
Put 1 to 1 1/2 C. walnuts and crush them with a measuring cup. 
Add walnuts to the other ingredients, and stir until combined. 
Now, prep your jars. Spray cooking spray on them, and wipe off any excess spray from the tops and outsides of jars. Using a regular tablespoon, carefully scoop batter into jars, (a little over half full), making sure to avoid getting batter on tops of jars. Add a whole walnut to each jar just for a special touch. 
Bake at 375 for about 28-30 minutes. More time may be needed, so once a toothpick is inserted and comes out batter-free, your brownies are done! Be careful when handling the jars, as they are very hot.

Wednesday, December 3, 2014

Fall Leaf Rice Krispy Treats / Made the REAL way!

Ever wonder why your rice krispy treats don't turn out soft, rich, buttery, and super tasty? You may be using the wrong method. Here, I will show you the old-fashioned way to make Rice Krispy Treats on the stovetop - with real butter.
I love how these little leaf treat pops turned out! They could be customized to just about any holiday or party theme, too! Feel free to add food coloring to them to really customize them in a new, unique way. 
Here we go!
Ingredients:
- 3 Tbsp. REAL Butter (Organic Preferred)
- 6 C. Rice Krispy Cereal 
- 6 C. Marshmallows
- Sprinkles in Seasonal Colors
(Not Pictured)
- Parchment Paper
- Baking Dish 
- Smaller Wooden Skewers
- Leaf-Shaped Cookie Cutters
Instructions: 
In a large pot, melt butter over low heat (slower is better, so the butter doesn't burn.). 
As that melts, add marshmallows. Continue to melt the ingredients over low-medium heat. 
Make sure to watch the mixture so it doesn't brown. 
The mixture should look a little something like this right before you add the cereal.
Add the cereal and mix well to combine all of the ingredients. 
Next, transfer the cereal mixture to the pan. 
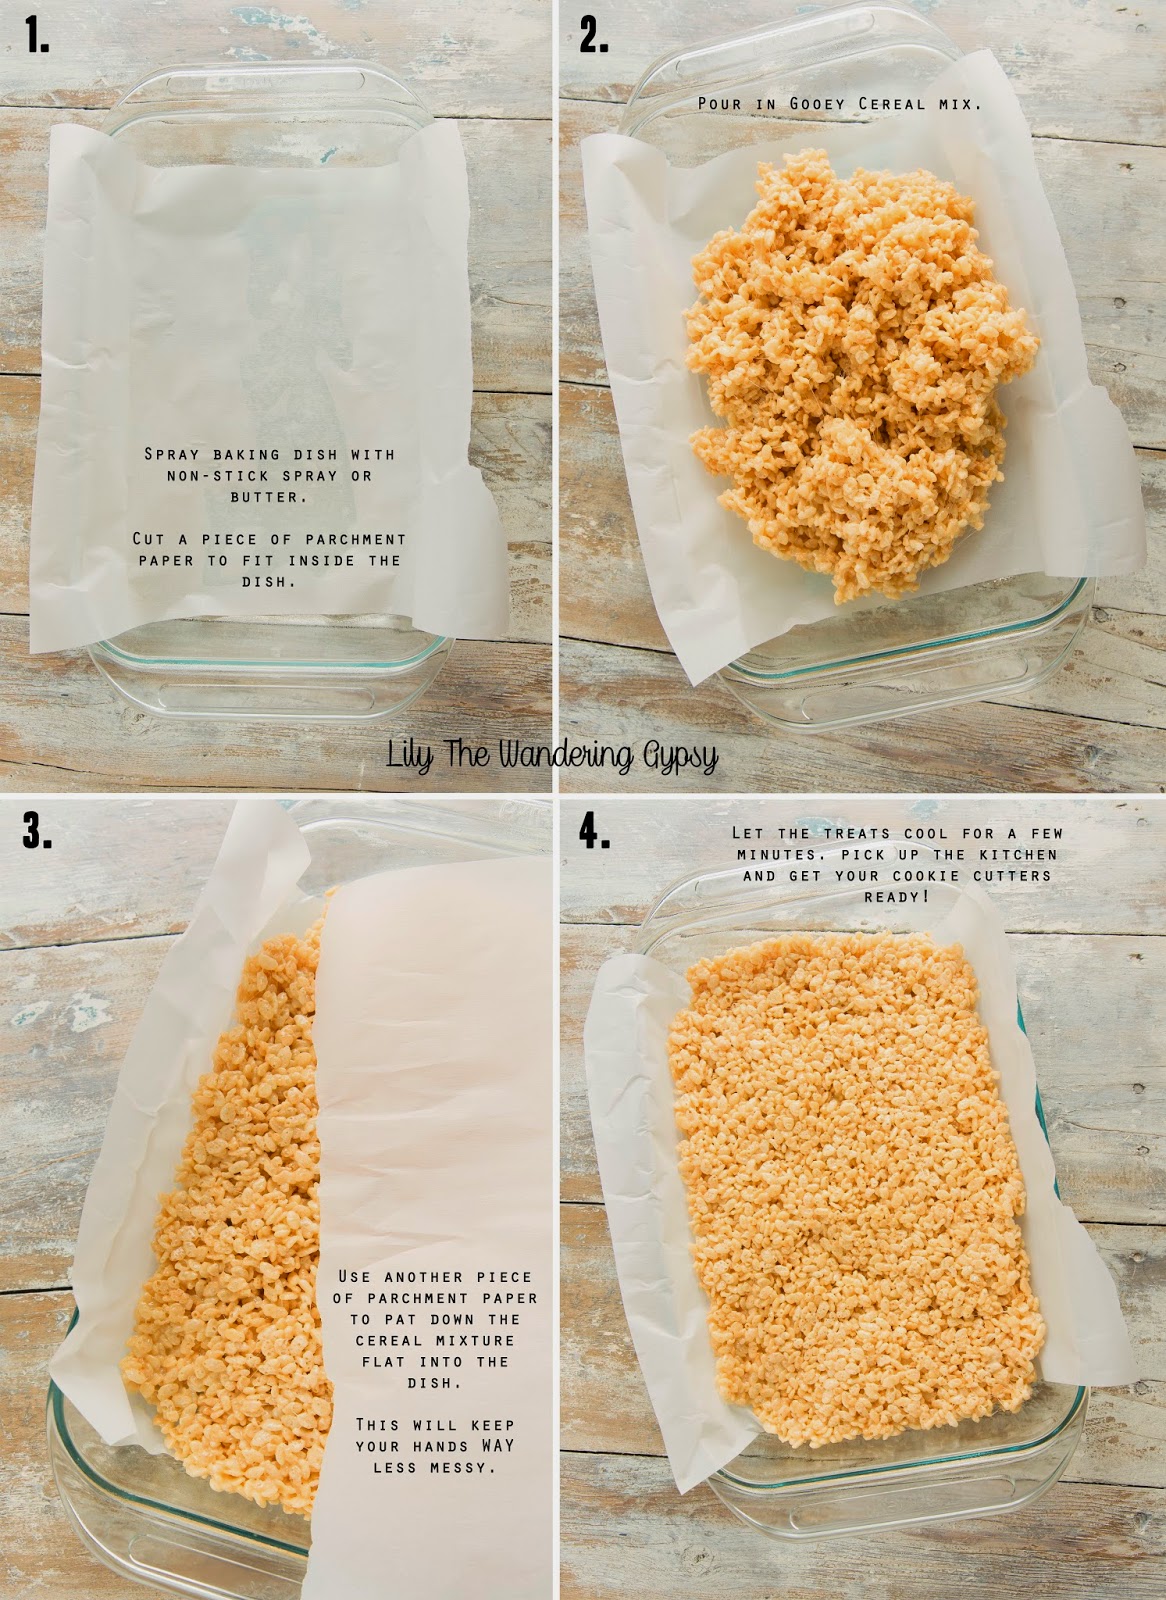
1.) Spray baking dish with non-stick spray or butter. Cut a piece of parchment paper to fit inside the dish.
2.) Pour in Gooey Cereal Mix.
3.) Use another piece of parchment paper to pat down the cereal mixture flat into the dish. This will keep your hands WAY less messy.
Once cereal has cooled, remove the cereal and parchment paper, and put it onto a cutting board.
Use your favorite leaf-shaped cookie cutter, press firmly down into treats. You can use a bit of non-stick spray on the cookie cutter if the treats stick. Carefully insert small skewer sticks into the leaves. Make sure you don't jab your hand...
I got about 12-13 leaves out of my batch, and had lots of pieces left over to devour :)

Enjoy! Happy Fall!

One Pot - Super Easy and Tasty Pesto Pasta Recipe

Pasta couldn't get much easier than this. It's nice and light, and super fresh. 

Here are most of the ingredients. You will also need grated parmesan cheese, 2-3 Tbsp of extra virgin olive oil (or your favorite), as well as some salt and Italian seasoning, to taste. 
How To Make This Super Easy Pesto Pasta:

Boil noodles as directed. Strain and return to original pot. Scoop about 3-4 tablespoons of Pesto onto noodles. Also add your olive oil, Italian seasoning, and salt. Stir together, combining well. Turn the heat back on to low. Add mozzarella pearls, and stir. They should melt pretty quickly. Once they're melted, sprinkle past with parmesan cheese, and stir once more. 
Serve topped with more parmesan cheese and chopped tomatoes. 

Enjoy! 
Ingredients Via: PestoMozzarella Cheese Pearls

Patriotic PopCorn!

So, I was invited to a Pinterest Potluck and created a little treat for it. This Patriotic POPcorn was pretty easy, and required only a two ingredients. Popcorn and Candy Melts.

Ingredients:

- One Bag of Lightly Salted Pop Corn - I used something like this
*Do not use white cheddar, it won't taste as good*

- One Bag Each of Blue and Red Candy Melts (pictured below). 

That's it. Here are some blue candy melts, below.
Other Supplies:

Two medium sized microwave-safe dishes, and two heat-safe spatulas (one for red, one for blue).
Instructions:

1.) Decide how much popcorn you want to use. You will need 8 candy melts per 1 cup of popcorn. The red ones coated the popcorn a bit more intensely than the blue ones did. 

2.) Melt the candy melts in the microwave at half power for 1 minute and stir. Melt again for 30 second intervals until you are satisfied with the texture. If you don't wish to use a microwave, a stovetop double-boiler method is best. Be very careful, candy will be HOT!!! Let candy sit for a few minutes to cool. Here is more info on melting the candy melts.

3. In each bowl, put desired amount of popcorn. Carefully drizzle the candy melts over top of the popcorn and stir each color with a large spatula.

4. Let popcorn mixtures cool separately for about an hour, until candied popcorn has hardened and cooled to room temperature. Mix the blue and red popcorn together in a fresh serving bowl. Serve and enjoy. 

Tuesday, December 2, 2014

Super Easy Patriotic Ice Cream Sandwiches

These Patriotic Ice Cream Sandwich Pops were some of the easiest treats I've ever made. The sprinkles helped keep them from dripping if they melted, too! 
It's best to make these in a cool place, as they can melt rather quickly. 
I found a trick to remove only part of the wrapper, and insert the popsicle stick. The sandwich will stay in tact much better. I also recommend working on one ice cream sandwich at a time.
Next, remove the rest of the wrapper. Hold the sandwich over a plate, and apply sprinkles to every side of the ice cream sandwich. Put them on a cookie sheet in the freezer for best results. You're all done, it's THAT easy! 


Find more ideas for your Fourth of July bash here, on my Stars and Stripes Board

Red , White, & Blue French Toast

I made a little French Toast brunch inspired by red, white, and blue! I used coconut oil for my pan, too! 


Gather your ingredients: Milk, Eggs, Bread, Vanilla, Cinnamon, Blue Sprinkles, Whipped Cream, Butter, Coconut Oil, Maple Syrup, and Berries. You will also need a spatula. 

Heat large skillet (mine holds 3 pieces of bread) to the higher side of medium. While that's heating, in a medium mixing bowl, combine 3 eggs, 1/2 C. (or more) milk, 1-2 tsp, vanilla, and a sprinkle of cinnamon. Whisk with a fork. I have heard people use nutmeg a lot for this, but have never tried it. 

Put a dab of coconut oil onto your skillet, and watch it melt pretty quickly. Use your spatula to spread the oil and coat the pan. 

Dredge the slices of bread into the egg mixture, and carefully place each slice of bread onto the skillet. 

While those are beginning to cook, slice up your berries if necessary. Check the underside of each piece of bread to see how brown it is. If you use a proper cooking temp, these should not burn easily, but if you use super high heat, they will cook too quickly and burn. 

After thee slices become golden, flip them, and cook for another couple of minutes. Flip a few more times if needed. 

Place the slices on a plate, add butter, syrup, Whipped Cream, Berries, and top them off with Sprinkles. Serve and watch the smiles! This is a pretty rich recipe, so be prepared to be full :)