Showing posts with label no-bake. Show all posts

Friday, April 10, 2015

Super Easy - 2 Ingredient Cookies and Cream Ice Box Cake

My grandma used to make this for me every time I visited. I always loved it and finally made some myself. This cake is great to make on a warmer day, because you don't even have to turn on the oven. It only requires 2 ingredients, Chocolate Wafers, and Cool Whip, so that's an added bonus as well! 


It's super simple! Grab a loaf tin and your 2 simple ingredients. First, spread 2-3 Tbsp of Cool Whip on the bottom of the tin evenly. Then, add a layer of chocolate wafers. They fit perfectly with 2 across. At the short side of the tin, a whole cookie wouldn't fit, so I added some cookies that were already broken in half.
Keep layering the Cool Whip and Chocolate Wafers until you are out of ingredients. I liked when the layers of Cool Whip were thicker, but whatever you wind up doing will be great! I also crushed up some of the broken cookies (in my fingers) and lightly sprinkled them on top of the cake for a bit of added cuteness! 
Pop the "cake" into the freezer, and let it freeze over night. Voila! You have an incredibly easy, no-bake Cookies and Cream Ice Box Cake! 

Saturday, February 7, 2015

Gourmet Chocolate Heart Candies - Made At Home!

I had SO much fun creating these heart chocolates. I made them in several varieties, and I am going to tell you how each one turned out! I used the highest-quality ingredients, mostly from the baking aisle and craft stores (for the heart mold and sprinkles). These turned out so well! 
 These would be the perfect Valentine's Day gift for someone who loves sweets but is hard to shop for! These aren't super expensive to make, like some seasonal recipes are, either! 
******
INGREDIENTS:
*Note - do not use almond bark or candy melts for this method*
For best results, use a spoon to place toppings in heart mold. Let's begin the fun! 
Here are my "toppings" from left to right. 
Heath - make sure to only use a light, single layer of these or they won't all stick to the chocolate.
Andes - My favorite! Fill with Andes about 1/3 of the way.
Sprinkles - Look best on white chocolate, rather than milk.
Chopped Walnuts - Use only a light layer, similar to Heath.
Larger Sprinkles - use a single layer for best results.
*The prettiest ones were the little nonpareils (tiny ball sprinkles) in a single layer*
Now, melt the chocolate! I used a double boiler method (explained here - but do not add any butter). I used a shallow, medium pot and filled it about 1/3 of the way with water. I placed two 2 Cup Pyrex measuring cups in the water for a double boiler. Melt 1 package each of the milk chocolate and white chocolate in separate cups. Slowly melt the chocolates, and stir frequently. They should be smooth and move easily. 
******
Once your melted chocolate is smooth, remove the cups with an oven mitt, and place them onto a towel near your work space. Get a little bit of chocolate onto a spoon, and begin adding milk chocolate to half of the hearts...
And, white chocolate to the other hearts. Be careful not to get chocolate everywhere, so your end result is prettier.
Carefully, slide the hearts onto a baking sheet or cutting board to transport them into the freezer. 
Here they are after being in the freezer for less than an hour! Make sure they are completely cooled and hardened before you move them. 
One of my favorite parts was removing the fresh chocolates from the molds and seeing my creations! I liked most all of them, and think they would look adorable packaged up all cute for Valentine's Day! 

Thursday, January 22, 2015

Smoothie Time! Mixed Berry and Banana Smoothie

I have been wanting to jump into making smoothies for a long time now, and here is my first attempt! I learned a little bit and this tasted really, really good. Slightly Earthy, but in time I am sure these will only get better. I am trying to incorporate as many fresh ingredients into my days as possible. 
INGREDIENTS for about 2 smoothies:
1 Cup Ice - (blend this in the blender before adding fruits and spinach)
1/3 pint blueberries
1/3 C. raspberries
2 bananas - cut into pieces
A small hand full of spinach, chopped or ripped into small pieces
1/4 - 1/2 Cup Pineapple Juice (or any juice you have on hand)
HOW TO:
Crush ice in blender. Add fruits and spinach, and blend for about 30 seconds, or until completely combined. If you want a thinner smoothie, just add more juice. 
This smoothie was very tasty. You get a nice taste of each of the ingredients, without tasting the spinach too much :) I am sure you could use frozen fruit as well. 
I hope you enjoy these, they kept me more full than expected!

Wednesday, December 3, 2014

Fall Leaf Rice Krispy Treats / Made the REAL way!

Ever wonder why your rice krispy treats don't turn out soft, rich, buttery, and super tasty? You may be using the wrong method. Here, I will show you the old-fashioned way to make Rice Krispy Treats on the stovetop - with real butter.
I love how these little leaf treat pops turned out! They could be customized to just about any holiday or party theme, too! Feel free to add food coloring to them to really customize them in a new, unique way. 
Here we go!
Ingredients:
- 3 Tbsp. REAL Butter (Organic Preferred)
- 6 C. Rice Krispy Cereal 
- 6 C. Marshmallows
- Sprinkles in Seasonal Colors
(Not Pictured)
- Parchment Paper
- Baking Dish 
- Smaller Wooden Skewers
- Leaf-Shaped Cookie Cutters
Instructions: 
In a large pot, melt butter over low heat (slower is better, so the butter doesn't burn.). 
As that melts, add marshmallows. Continue to melt the ingredients over low-medium heat. 
Make sure to watch the mixture so it doesn't brown. 
The mixture should look a little something like this right before you add the cereal.
Add the cereal and mix well to combine all of the ingredients. 
Next, transfer the cereal mixture to the pan. 
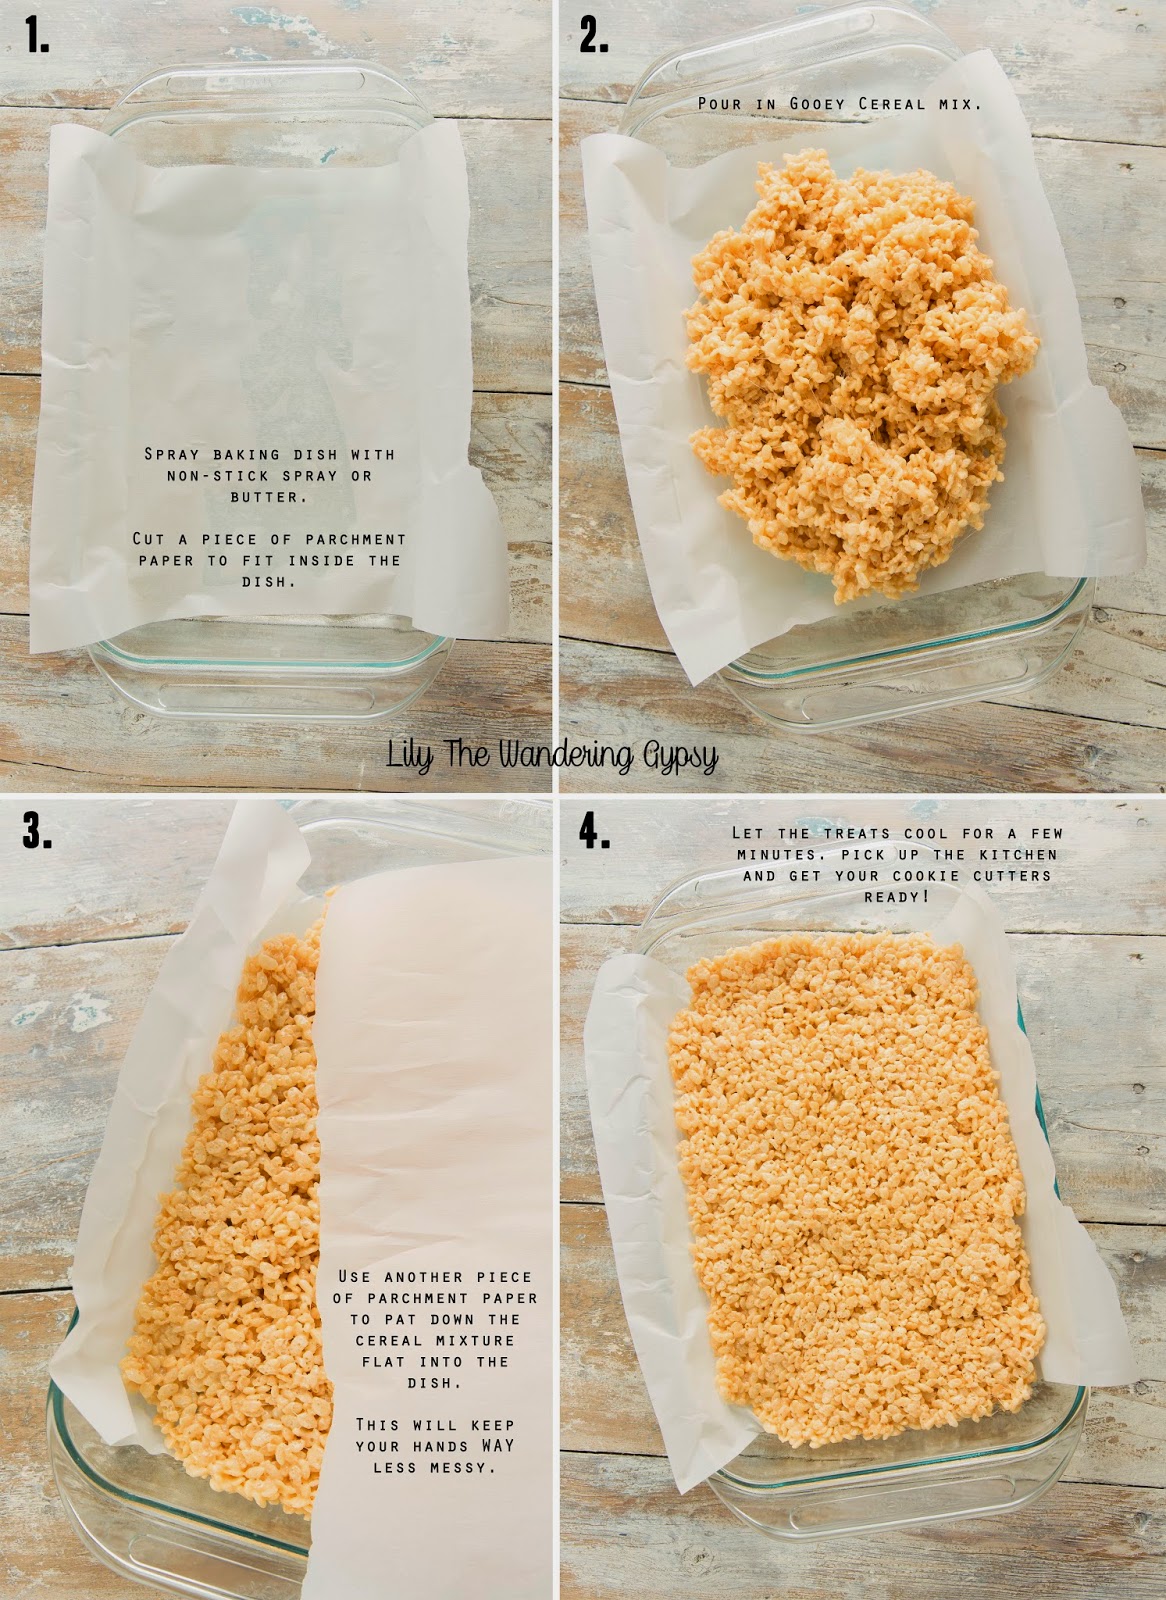
1.) Spray baking dish with non-stick spray or butter. Cut a piece of parchment paper to fit inside the dish.
2.) Pour in Gooey Cereal Mix.
3.) Use another piece of parchment paper to pat down the cereal mixture flat into the dish. This will keep your hands WAY less messy.
Once cereal has cooled, remove the cereal and parchment paper, and put it onto a cutting board.
Use your favorite leaf-shaped cookie cutter, press firmly down into treats. You can use a bit of non-stick spray on the cookie cutter if the treats stick. Carefully insert small skewer sticks into the leaves. Make sure you don't jab your hand...
I got about 12-13 leaves out of my batch, and had lots of pieces left over to devour :)

Enjoy! Happy Fall!

Tuesday, December 2, 2014

Super Easy Patriotic Ice Cream Sandwiches

These Patriotic Ice Cream Sandwich Pops were some of the easiest treats I've ever made. The sprinkles helped keep them from dripping if they melted, too! 
It's best to make these in a cool place, as they can melt rather quickly. 
I found a trick to remove only part of the wrapper, and insert the popsicle stick. The sandwich will stay in tact much better. I also recommend working on one ice cream sandwich at a time.
Next, remove the rest of the wrapper. Hold the sandwich over a plate, and apply sprinkles to every side of the ice cream sandwich. Put them on a cookie sheet in the freezer for best results. You're all done, it's THAT easy! 


Find more ideas for your Fourth of July bash here, on my Stars and Stripes Board